Like the following image....

Step 1:
Open an image on which you wish to add the rainbow. Press D. (to set default foreground and background colors) Create a new layer by clicking on the
Step 2:
With the new layer selected, click on the Gradient tool on the tool bar. Now the gradient properties will be displayed just below the main menu as in the image below. Give similar settings as in this image. Next click on the gradient image (marked in red below)

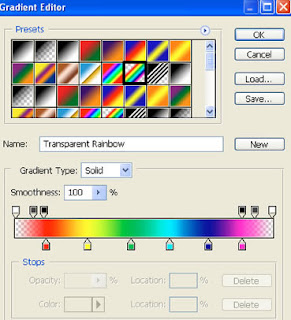
The Gradient Editor will be displayed as in the image below.

Step 3:
From the presets, select the sixth colored box on the second row (marked in black). Below you'll see the colored bar with pencil icons called tab stops.
Step 4:
Drag on these color tabs and reduce the width and opacity using the opacity tabs above. Experiment the different tab stops and you will have an idea what each tab stop is meant for. If you wish to remove any tab stop just drag the tab stop out of the window.
Step 5:
Add a new tab stop with the color orange. To create a new tab stop just click on the bottom border of the rectangle, a new color tab stop with the same color to its next color stop. By clicking on this color tab stop you can change the color. Drag the colors to the right side.
Step 6:
This is how the settings look after all the changes.

Step 7:
After you create the new gradient, click on OK. Now you'll see this gradient in the gradient properties bar (below the main menu).
Step 8:
From the gradient properties select the radial gradient, place the cursor at the bottom left corner and drag it to the top middle edge of the image. (Try out different positions till the rainbow position suits your image)

No comments:
Post a Comment